
Components needed:
- Mk3 Golf Rad
- GT6 Thermostat Cover
- 1-1/4" Dia Rad Hose Elbows ~100-110deg x2
- Vacuum Cleaner Piping (Yes from a central vac or equiv.)
- 4 additional rad hose clamps
- 1" x 1/8" x ~28" Aluminum Stock
If the radiator is from a scrapyard donor it will have a built in thermostat to control the fans. You can use this to directly switch the fans on or use it to trigger the relay(s) as I have done.

The dimensions for the golf rad. It is also 1.25" in thickness.

The stock vehicle schematic is as shown. This gives basic two speed operation for one fan. You could easily adapt the stock fan to work in the Spitfire. However I have chosen to use a single 10" 1200cfm one from ebay.


I plumbed the stock VW Golf expansion bottle with the top hose being connected to the top air bleed on the rad and connected the lower outlet to an addition port on the lower pipe.

This lower pipe was the only part of the cooling system which had to be made. I took a piece of 1/2"OD aluminum piping which was left over from the Megajolt installation. I flared one end of it using a 3/8" drive socket which tapered and fit nicely inside. I them drilled a 1/2" hole in the vacuum tube and made it slightly oblong so that I could push the 1/2" pipe through from the inside. This way the flare will make sure that enough if the JB weld cracks, the section of pipe stay connected. It will also transfer some of the load better. I sealed the joint with JB weld, allowing it to dry for two days.

All of the rad hose bends were from a single S shaped section of 1-1/4" rad hose which I found at a local parts supplier. Now your probably wondering how you make that crazy turn to the right for the rad inlet as it used to be on the left. I just turned my thermostat cover 180deg which worked perfectly with the bends of rad hose I had, however I plan to turn it back and use a swirl tank from merlin which will purge the air better and make a nice 90 bend at the same time. This would also replace the VW expansion tank as the swirl tank has it's own pressure cap.
As of right now the system is working perfectly with the air being slowly purged into the expansion tank and the fans coming on automatically.
Stay tuned for more details on the swirl pot plus an updated schematic which includes a fan operation light and PDF templates for the bracket to mount the fan(s).
Update!
I have removed the special tee piece mentioned above and instead put a tee into the manifold heat loop at the rear of the blog and moved the air bleed from the rad's position to the thermostat cover. This looks much cleaner. The tank will be replaced in the near future with an aluminum one from Merlin Motorsports.


The dimensions for the golf rad. It is also 1.25" in thickness.

The stock vehicle schematic is as shown. This gives basic two speed operation for one fan. You could easily adapt the stock fan to work in the Spitfire. However I have chosen to use a single 10" 1200cfm one from ebay.

To mount the fan to the rad and to mount the rad to the frame and give it some rigidity I added two 1.5"x1/8" strips of aluminum to the top and bottom of the rad. I pre-drilled and tapped a series of holes in the strips before permanently fixing them to the rad with JB weld.

I mounted the fan by using a pair of brackets made from some thin alloy. One for the top and one for the bottom. I also made a pair to allow me to mount my oil cooler on the rad as well however it is not installed right now as I am waiting for an external oil filter mount kit and thermostat.
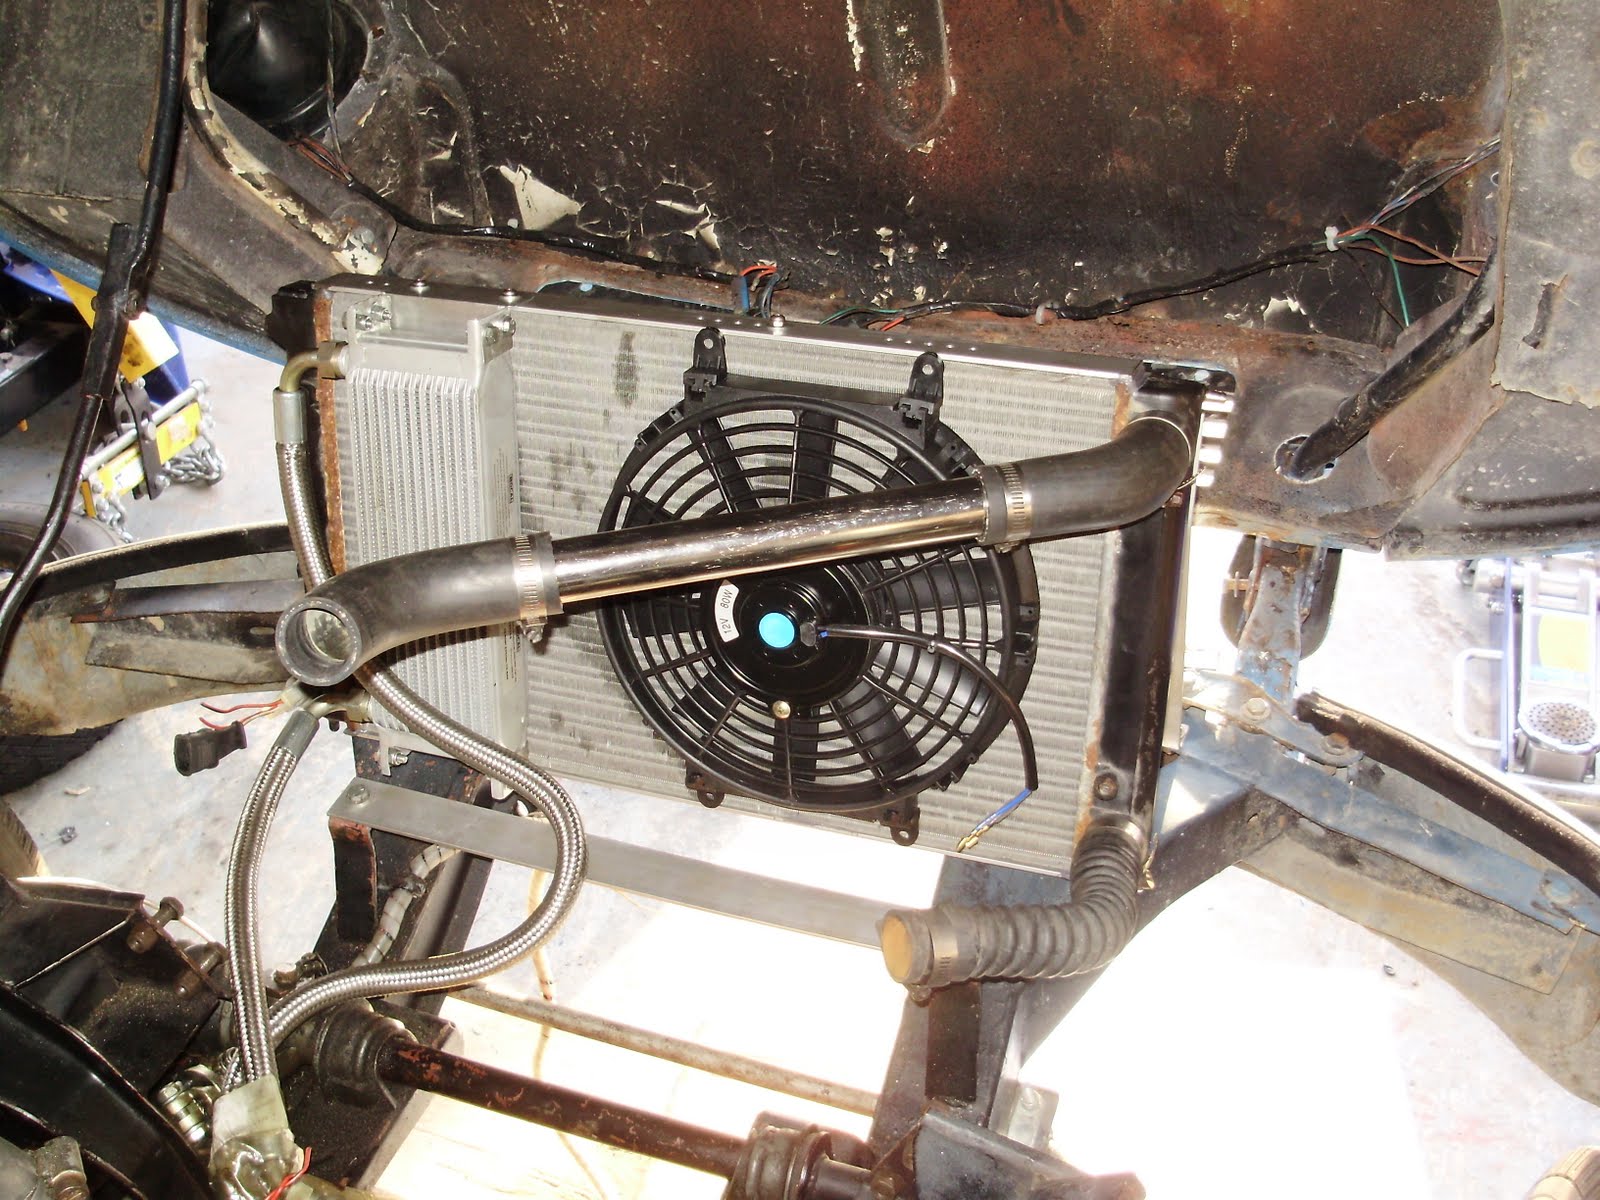
I mounted the front of the rad by bending a pair of braces from 1"x1/8" aluminum and using existing holes on the frame. The rad was attached to these using the stock holes and screws.

I plumbed the stock VW Golf expansion bottle with the top hose being connected to the top air bleed on the rad and connected the lower outlet to an addition port on the lower pipe.

This lower pipe was the only part of the cooling system which had to be made. I took a piece of 1/2"OD aluminum piping which was left over from the Megajolt installation. I flared one end of it using a 3/8" drive socket which tapered and fit nicely inside. I them drilled a 1/2" hole in the vacuum tube and made it slightly oblong so that I could push the 1/2" pipe through from the inside. This way the flare will make sure that enough if the JB weld cracks, the section of pipe stay connected. It will also transfer some of the load better. I sealed the joint with JB weld, allowing it to dry for two days.

As of right now the system is working perfectly with the air being slowly purged into the expansion tank and the fans coming on automatically.
Stay tuned for more details on the swirl pot plus an updated schematic which includes a fan operation light and PDF templates for the bracket to mount the fan(s).
Update!
I have removed the special tee piece mentioned above and instead put a tee into the manifold heat loop at the rear of the blog and moved the air bleed from the rad's position to the thermostat cover. This looks much cleaner. The tank will be replaced in the near future with an aluminum one from Merlin Motorsports.

